Overview
Contact tagging is a lightweight way to organise subscriber data, so you can segment lists and groups of contacts for more personalised messaging. Much like hashtags on social media, contact tagging enables you to tag contacts with a keyword or phrase. This can then be used to create filters in the platform, so you can send communication to people with related needs and interests.
Tags enable you to connect contacts from multiple lists based on related tags. This enables you to send relevant communication quickly, with fewer manual processes of creating, importing, and updating lists and fields.
Common examples of tags include contact behaviour, sign-up date, the source of their data, interests, if they’re customers, if they’re on a free trial, etc. You can also have an infinite number of tags on one contact.
Tag Manager Dashboard
On the Tag Manager dashboard, you can:
- View and edit the tags you’ve imported or created (you currently can’t view automatically generated interest-based tags)
- See details on each tag, like how many contacts are tagged with it, when it was created, and when it was last modified
- Delete one or multiple tags by checking the checkbox next to the relevant tags then pressing the dustbin icon at the top left of the Tag Manager dashboard once the desired tags are selected.
How to Tag Contacts
The tag manager page is a work in progress. For now, the best way to tag contacts is via imports. To do this, follow the standard import process and ensure that you:
- Include a tags column in your list.
- Separate each tag with a comma in the tags field.
- When you map your fields, map the tags column as tags.
You can also create a tag directly in tag manager, but there is not yet a way to allocate those tags to contacts. For now, we recommend sticking to the imports process.
NB: You can’t override existing tags with new tags
When importing tags, the platform currently only adds new tags, it doesn’t override existing tags. For example, a tag that shows a contact as ‘inactive’ can be added, but it won’t replace an ‘active’ tag. This could result in a contact receiving communication for active and inactive subscribers.
If you need to be able to override old data with new data like this, rather use a custom field.
Interest-Based Tags
Interest-based tagging automates the tagging process using machine learning. You don’t load them as part of your imports like manual tags and you can’t edit them, as the data is generated by Google.
How Interest-Based Tags Work
Interest-based tags track the links your email recipients are clicking in your emails and uses natural language processing (a form of machine learning) to categorise the content from those web pages. From here, the platform automatically tags your contacts with that category name in your lists.
You can enable interest-based tags on one or all your emails when creating your next email. To do this:
- Start by creating your email, including the email properties and design.
- In the Delivery Options step, you’ll see a Tracking Options Click on it.
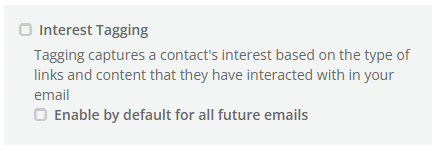
- On the tab, you’ll see a section dedicated to interest tagging. Click the checkbox that’s relevant to you.

Interest-based tags will now automatically be created and allocated to your contacts when they click on links in your email/s.
Create Filters with Tags
To create a filter using your tags:
- On the platform dashboard, go to Database Management > Filters.
- Click on Create Filter.
- Add a name and description of your filter.
- Select either the Tags tab (for tags you’ve imported) or the Interests tab (for interest-based tags).
- Search for and select the tags or interests you’d like to filter on.

