Overview
Before you can start sending messages via email, SMS, or voice broadcasting, you need to import your contact database into the system. This section will show you how to do that and how to pull reports on those imports.

How to Import Contacts
Tutorial Video
Prepare Your Contacts
If you’re going to import your contacts from an Excel spreadsheet, first prepare the data by:
- Organising the data, so each field has its own column (email address, name, surname, etc.)
- Making sure that each contact’s details are captured in their own row
- Fixing incorrect email addresses before importing (e.g. ‘[email protected]’ is probably incorrect and should be changed to ‘[email protected]’)
Download our Import Sample File if you get stuck – this will give you an idea of what to aim for.
Once imported, contacts are stored in the system as lists, which are basically spreadsheets housing each contact’s details.
Select Your Import Type
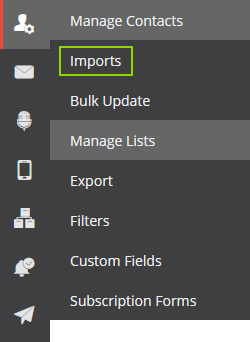
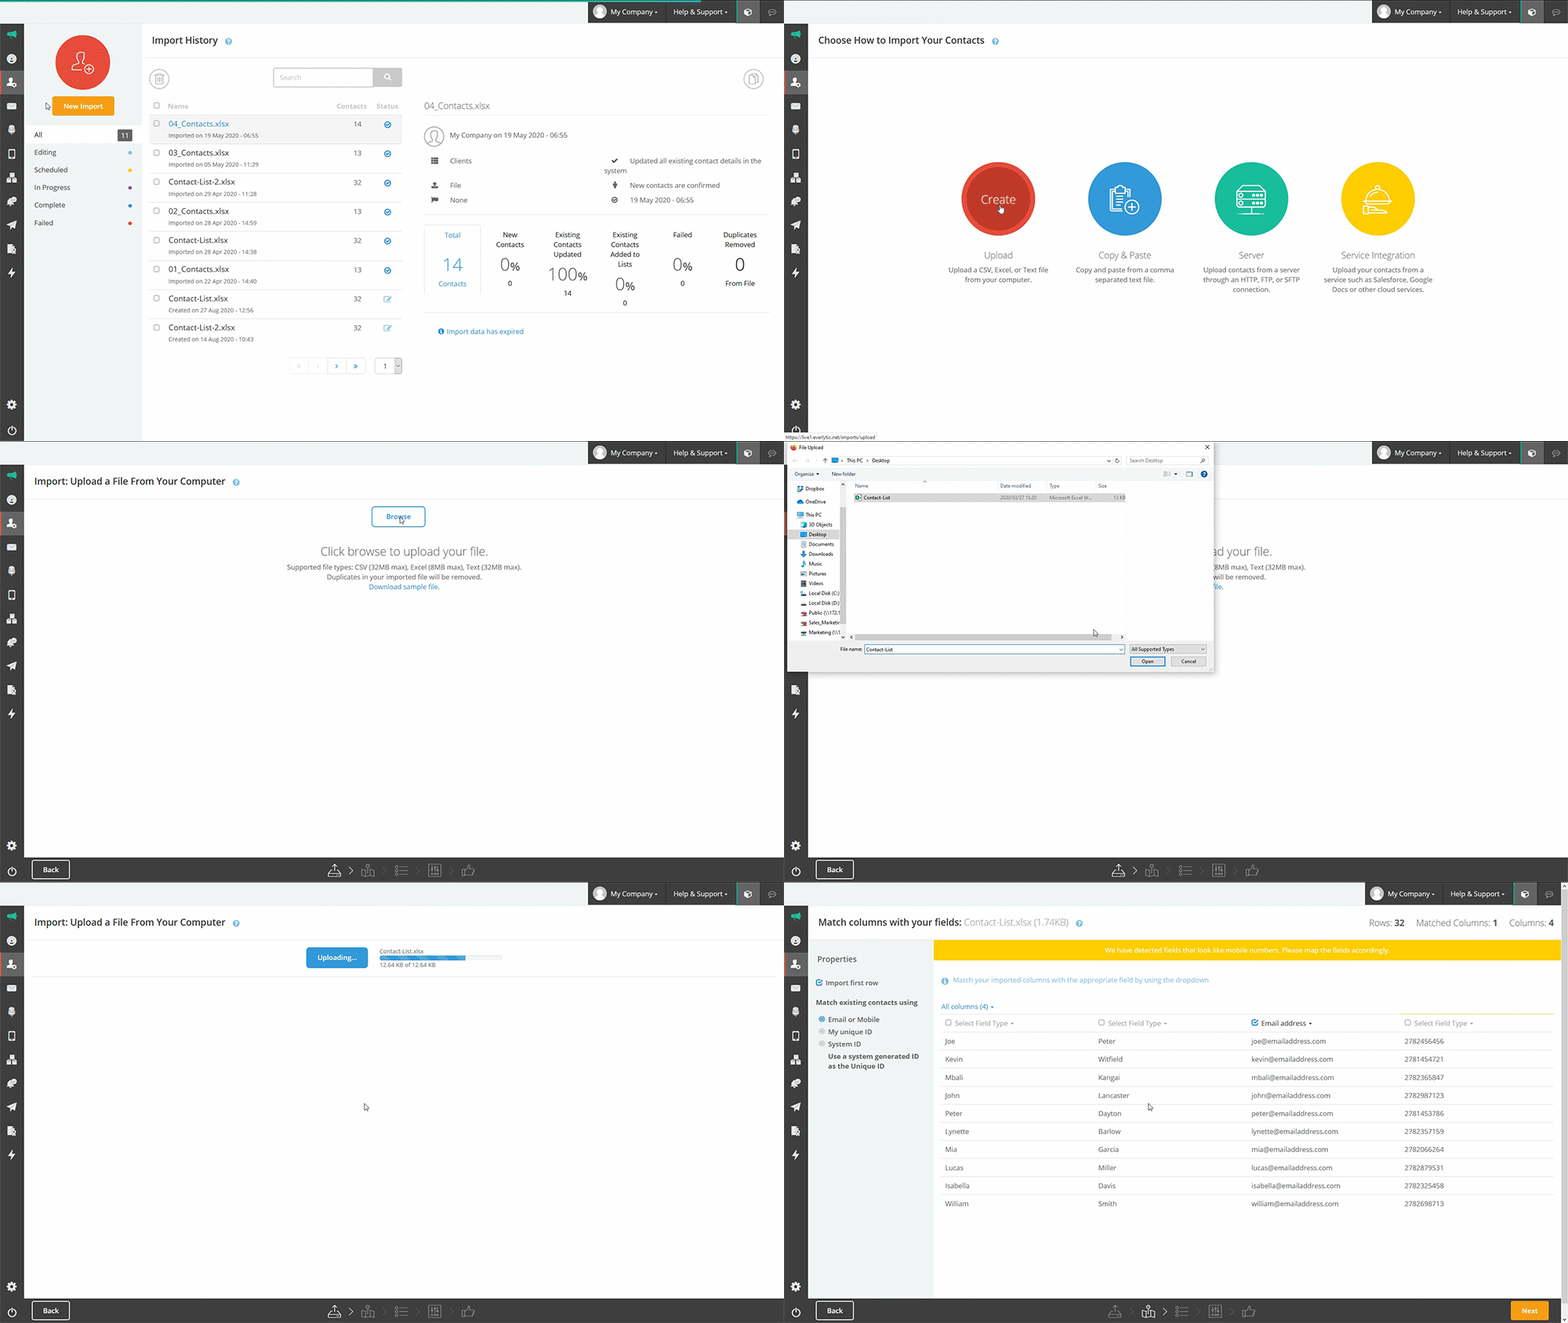
To import contacts, go to Database Management > Imports. On this dashboard, click the New Import button. From here, you can import your contacts in the following ways:
1. Upload a CSV, Excel, or Text file from your computer
Use this option when you have an existing database stored on your computer. We support TXT, CSV, XLSX and XLS file formats.
- Click the Upload icon
- Click the Browse button
- Browse for your file and click Open

Download our sample file to see what your Excel file should look like.
Once you’ve uploaded your list, you have the following options:
- Set contacts as ‘unconfirmed’ on import and send them a confirmation mail.
- Update all existing contact details in the system with the imported data.
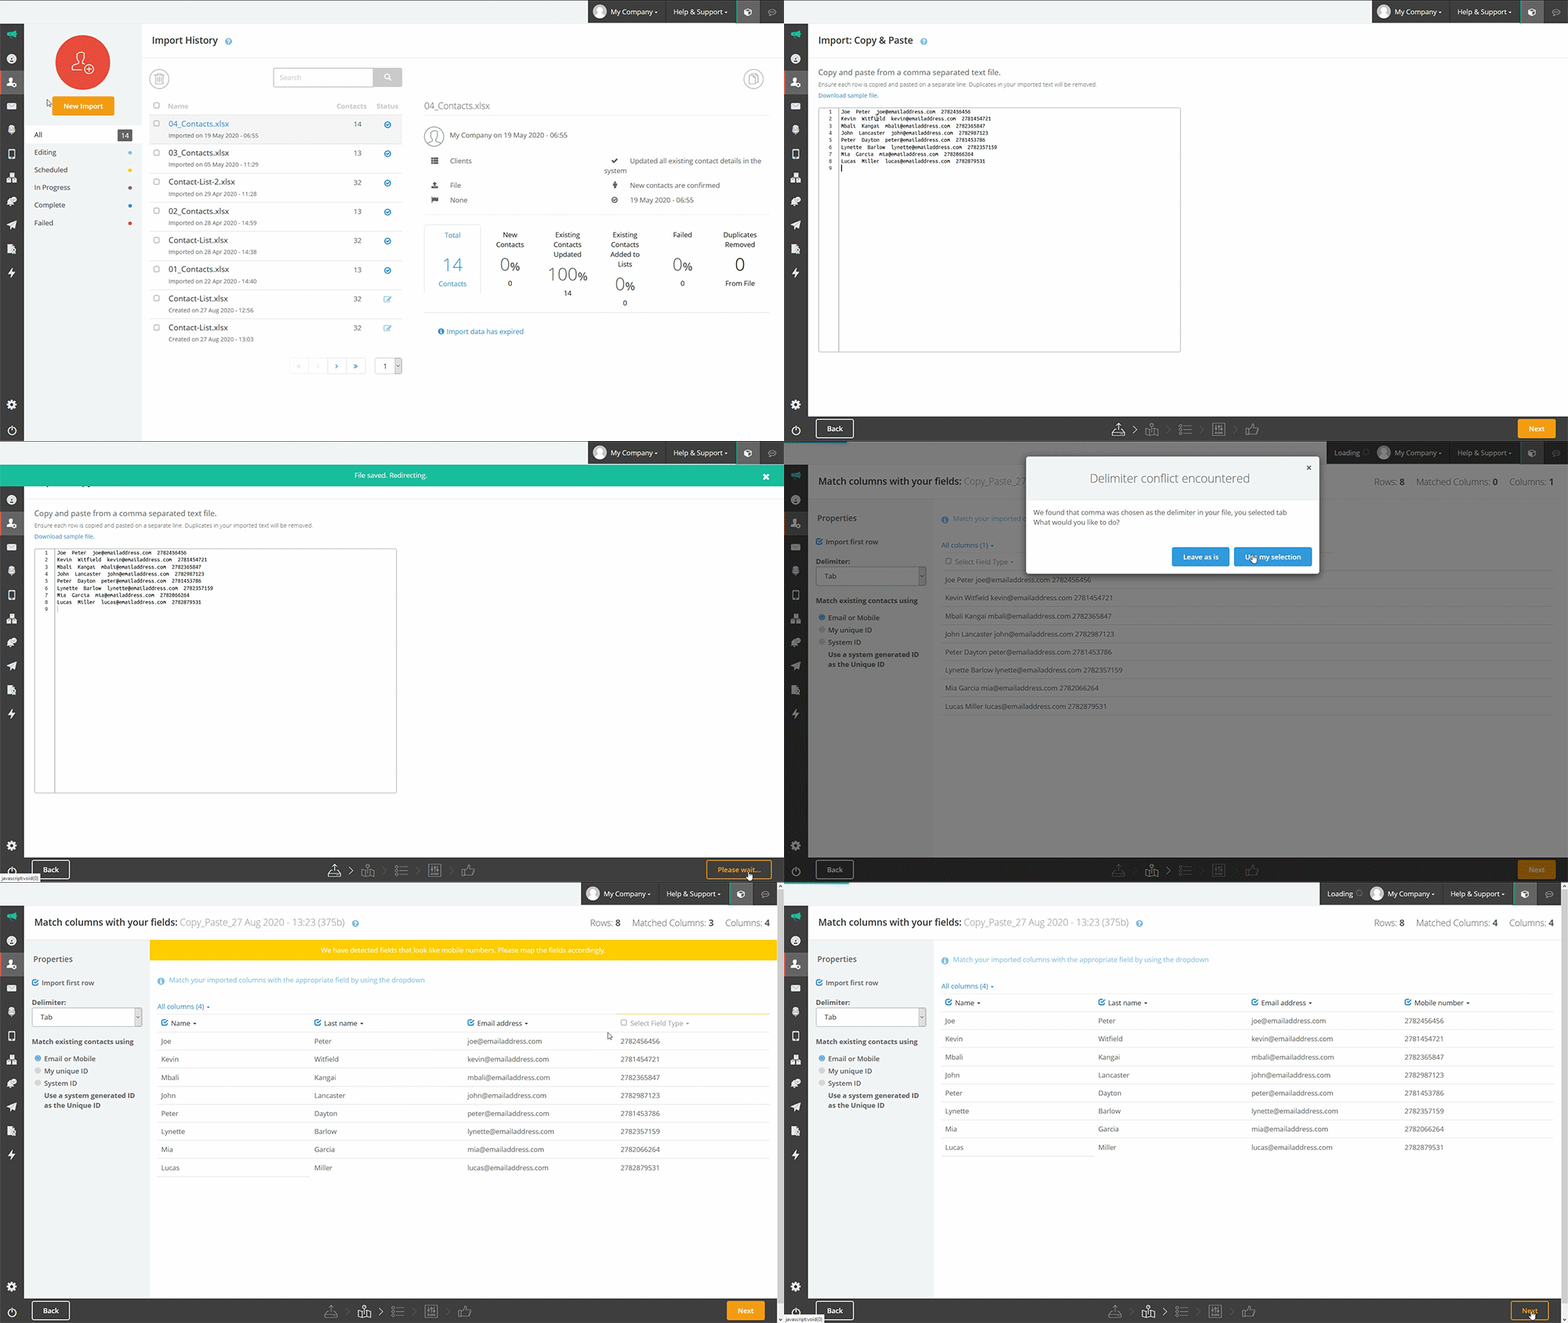
2. Copy and paste a few contacts into a text box in the platform
If you only have a few contacts to import, you can use the copy and paste function to manually add them to your list from an Excel spreadsheet (with separate tabs) or a comma-, pipe-, or semi-colon-delimited text file.
- Click the Copy & Paste icon
- Copy and paste your contacts’ details from your text file or Excel spreadsheet. Ensure each row is copied and pasted separately on its own line.
- Click Next

Once you’ve copied your contacts into your list, you have the following options:
- Set contacts as ‘unconfirmed’ on import and send them a confirmation mail.
- Update all existing contact details in the system with the imported data.
Column names:
Column names label your fields (and any custom fields you may have set up before starting the import). Include them by pasting them into the first row. Download our example file to see how to format them so our system can use them to map your data.
3. Upload from an HTTP, FTP, or SFTP server
You can upload from an HTTP, FTP, or SFTP file server. For files hosted on an HTTP server, paste the URL into the field provided. If your file is hosted on an FTP or SFTP server, enter the server URL, username, password, and file name when prompted.
Once you’ve uploaded from the server, you have the following options:
- Set contacts as ‘unconfirmed’ on import and send them a confirmation mail.
- Update all existing contact details in the system with the imported data.
- Schedule the import by date and set a recurrence date for when the file will be imported again.
4. Upload from an integrated service like Google Contacts, Google Docs, or Salesforce
Follow these steps to import a list of contacts from a web-based service like Google Contacts, Google Docs, or Salesforce:
- Click on the Service Integration icon.
- Select the service you want to use.
- In the pop-up window, verify that you want to allow the system to access your selected account and follow the steps relevant to that service for the connection.
- Once you’ve enabled the connection, select the data you want to import.
Once you’ve uploaded from the selected service, you have the following options:
- Set contacts as unconfirmed on import to send them a confirmation mail.
- Update all existing contact details in the system with the imported data.
Once you’ve specified the source for your import, click Continue to move on to step 3.
Contact tagging
Contact tagging is a lightweight way to organise subscriber data, so you can segment lists and groups of contacts for intelligent targeting. Much like hashtags on social media, contact tagging enables you to tag contacts with content that can then be pulled together when you send a communication.
Until now, you’d have multiple lists or filters on those lists. Tagging, on the other hand, enables you to connect contacts from multiple lists based on related tags. This enables you to send relevant communication quickly, with fewer manual processes of creating, importing, and updating lists and fields.
Tagging is dynamic, it’s quick, and it gives you granular control of your segmentation, as the data you can include is endless. Common examples of tags include contact behaviour, sign-up date, the source of their data, interests, if they’re customers, if they’re on a free trial, etc. You can also have an infinite number of tags on one contact.
How to tag a contact
Tagging functions as a field in your data. Only, instead of having an individual piece of data for each field as you would with traditional lists, all tags are loaded within the tag field. To do this on imports, you follow the standard import process, only you’ll need to ensure that you:
- Include a tags column in your list.
- Separate each tag in the tags field with a comma.
- When you map your fields, map the tags column as tags.
NB: You can’t override existing tags with new tags
When importing tags, the platform currently only adds new tags, it doesn’t override existing tags. For example, a tag that shows a contact as ‘inactive’ can be added, but it won’t replace an ‘active’ tag. This could result in a contact receiving communication for active and inactive subscribers.
If you need to be able to override old data with new data like this, rather use a custom field.
Map Your Fields
Tell the system which field it must apply to each column of your data. The system will assign fields automatically, but if the wrong field has been applied, click the drop-down menu on the field name and choose the correct one. Any column without a field assigned to it will be excluded from the import.
When you’re happy with the fields assigned to your import, click Continue.
*Important
- If you’d like to use a custom ID to identify your contacts (e.g. pet’s name), create one before you start the import. To use it in this step, select the My unique ID radio button in the left-hand Properties panel and choose the correct field from the drop-down menu. Please note: We recommend using an email address, mobile number, or another field that is unique to each contact to avoid sending duplicate messages.
- If your first row is made up of field names, un-check the Import first row radio button so that the system doesn’t import it.
- If you copied and pasted your data in, specify the type of delimiter you used to separate the contact data.
- If any of your contacts don’t have info in your included fields (e.g. mobile number, email address), they will be excluded from the import.
- If you use a company’s landline number for multiple contacts and designate it as a mobile number, they will be tagged as duplicates and excluded from the import. This is because Mobile Number is treated as a unique identifier by the system.
Custom ID vs Unique ID:
Custom IDs are ones you specify yourself. Unique IDs are generated by the system – i.e.: the contact ID that’s generated when the contact is imported.
Import with a Unique ID
You can import your contacts using your own unique reference number as their unique identifier in the system. You’ll be able to search the database, view contact reports, and update contact details using this number. Create a custom field for this unique identifier before starting the import.
Follow these steps to use a unique identifier:
- Select My Unique ID in the left-hand Properties.
- Select the field that contains your identifier from the drop-down menu.
Importing Multi-Value Custom Fields
To import contacts with multiple-value custom fields, the fields must exist as custom fields set to Multiple Value before they can be imported with your contacts.
*Important
- Use the sanitised name found under Custom Fields as the import values. You can comma separate them to apply more than one option.
- In the import document, each multi-value option must have its own column. Before importing, set the value in the file to either on / true for true, or off / false for false.
Select Your List
Once you’ve mapped your contacts, move to the list-selection page by clicking Continue. Check the checkbox next to a list’s name to add your contacts to an existing list or click Create List to create a new list. In the modal that appears:
- Enter the name of the new list
- Enter the email address that the system can send list reports to
- Enter the list owner’s name
- Select the list group from the drop-down (not required)
- Click Create List
Choose Import Options
In this section, you can set the following options:
- Set contacts as unconfirmed on import to send them an opt-in confirmation mail
- Update all existing contact details in the system with the imported data
- Send a progress email to an email address of your choice
- Tag all new and existing contacts with tags from the newly imported list or create a new tag before importing
If you choose to use this import to update fields in an existing list, the platform will only update the fields that have new data in them – it will ignore blank fields from the new list, keeping any existing data in those fields intact.
In other words: if you have a contact’s email address on your existing list, but their email address field in your new import is blank, the import won’t clear the email address you already have. It will only update that field if you provide a new email address.
Confirm Your Import
Review the import settings you’ve selected and, if you need to, set any scheduling. If you notice any errors, you can return to a previous step by clicking the Back button in the bottom-left corner of the screen.
*Important
- If you go back to the first step, all your changes will be lost and you’ll have to start again from the beginning.
- Confirm that your list is permission-based and doesn’t contravene the system’s anti-spam policy by checking the checkbox in the top blue bar.
Once you’ve confirmed that the settings are correct, click Start Import. From here, your import goes into a queue and you can carry on with other work in the system (like composing an email campaign). You’ll receive an import summary email once the import is complete.
Import Reports
View import statistics on the Imports page by clicking on the name of the import. This will show you import stats by:
| View | Description |
|---|---|
| Total | The total number of contacts that were processed. |
| New Contacts | New contacts added to the system. |
| Existing Contacts Updated | Contacts that were already on the selected list that were updated. |
| Existing Contacts Added to Lists | Contacts that were already in the system that were updated and added to the selected lists. |
| Failed | Contacts that failed to import. |
| Duplicates Removed | Duplicate contacts that were removed from the list during the import. |
*Important
- Imported files expire after 7 days and can’t be edited. Scheduled imports will not expire.
- To export lists of the duplicates, failed, and fixed domain contacts, click on the Export tab at the top right and select All. The whole list will be exported in .CSV format. You can then make any corrections you need to and re-import the corrected .CSV list.

