Overview
Our system offers many powerful tools to manage your database contacts. This page shows you how to add contacts, view their information, understand their contact status and rating, as well as how to pull contact reports.
Note: We’re upgrading the way you manage your contacts in our platform. Read about the new beta version of this page here.
How to Add a Contact
This section will explain how to add an individual contact to one of your contact lists (databases). If you want to add more than one contact at a time, go to importing contacts.
- Go to: Database Management > Manage Contacts
- Click New in the top-right-hand navigation. This will bring up a contact-creation pane with three tabs:
- Properties: Your contact’s subscription parameters and lists
- More: Additional personal information about the contact
- Custom Fields: Details for any custom fields you’ve set up for your contacts (you must create these before importing / adding contacts)
*Important
- You must have either an email address or a cell phone number for each contact as these serve as unique identifiers in our system.
- The checkbox next to your selected list turns green when the contact is subscribed to that list and orange when they’re unsubscribed.
How to View / Edit Contact Info
To view / edit the details of an individual contact:
- Select the relevant list from the drop-down just under Contacts in the top left of the screen. The contacts on this list will appear below.
- Find the contact (use the scrolling arrows just above and to the left of the list if necessary) and click on it. Their details will come up on the right-hand viewing pane.
- Browse through the tabs to view the contact’s details or click Edit in the action bar in the top right of the screen (make sure you check the contact’s checkbox first).
Want to manually unsubscribe a contact from your list? Read here.
Contact Status
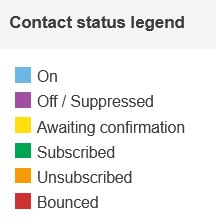
Every contact in your database is assigned a status depending on whether they want to receive your communications, or if the emails sent to them bounce. The checkbox next to each contact’s email address has a coloured border that indicates their status.
The following definitions apply to the contact status legend:
| Legend | Description |
|---|---|
| Awaiting Confirmation | The contact has been sent a confirmation mail but has not clicked the confirmation link. |
| Bounced | Mails sent to this contact have exceeded the bounce limit. Contacts that are bounced won’t be sent any mails on that list. |
| Off / Suppressed | Contact has complained and will not receive mail sent to any lists they’re on. |
| On | Contact is set to receive mail sent to all lists they’re subscribed to. |
| Subscribed | The contact is subscribed and will receive mails sent to that list. |
| Unsubscribed | The contact has unsubscribed from that list and will not receive emails sent to that list. |

Contact Rating and Scoring
Each contact is given a rating by the system, which is calculated using a contact score.
- Contact Score: A decimal number calculated by assigning values to every action the contact takes and dividing the positive actions by the negative ones. Reading emails, clicking links, forwarding to friends, or updating one’s profile, for instance, are positive actions. Bounces, spam complaints, unsubscribes, and general inactivity, on the other hand, are negative ones.
- Contact Rating: A star-value from 1 (poor) to 5 (excellent).
These figures identify your best-performing contacts, ranking them according to how engaged they are with your messages. Knowing who these contacts are enables you to create competitions or incentive campaigns for them.
Verifying Unconfirmed Contacts
An unconfirmed contact is someone who hasn’t yet confirmed that they want to be contacted by you. It’s bad practice to send emails to contacts who haven’t opted-in to your list – not just because it’s unethical, but also because you risk being marked as spam.
To send an email to an unconfirmed contact asking them to opt-in to your database:
- Find the contact you want to confirm.
- Click Advanced > Request confirmation in the action bar in the top-right-hand view of the screen. A confirmation email with a verification link will be sent to the contact.
Note: To verify their subscription, the contact must click the link. Once they’ve done so, their status will automatically be updated in the system.
Contact Reports
Detailed reporting is useful for viewing which messages have been sent to a contact and which were opened, clicked on, and forwarded by the contact.
To access contact reports:
- Go to Database Management > Manage Contacts.
- Either check the contact checkbox and select Reports or click the contact in the list and then click Reports in the Preview panel.
| Report | Description |
|---|---|
| Activity | This report goes into detail for the contact’s specific activities on each email. It shows graphs of message activity, a table with all the emails sent to this contact, and a table showing which emails were clicked when. |
| Bounces | This report gives details for hard and soft bounces, if any, for this contact. |
| Messages | This report shows a table of all the messages that were sent to the contact, including the subject, message type, and the date and time it was sent. |
| Overview | This report gives a summary of your contacts interaction with your mailing lists. It shows their activity, properties and the lists they are subscribed to. |

