Overview
The Microsoft Dynamics 365 plugin for cloud, on-premise, and older versions of Dynamics allows you to send event-driven automated bulk email and SMS messages directly from your Dynamics dashboard (e.g.: sending them to a rate-my-service page once the case is resolved). This helps you target the right audience based on their interaction with your messages and lead status.
Getting Started
Please contact us to get an access code and the necessary plugin files to save on your computer.
From there, follow these steps to set the plugin up on your MS Dynamics account.
1. Import the Plugin Solution
To import the Dynamics Plugin into your Dynamics account:
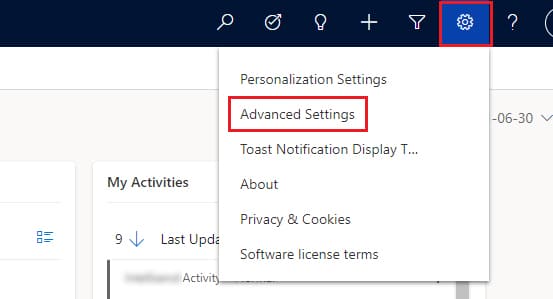
- From your Dynamics dashboard, click on the cog in top-right navigation and click on Advanced Settings. This will open a new settings tab.
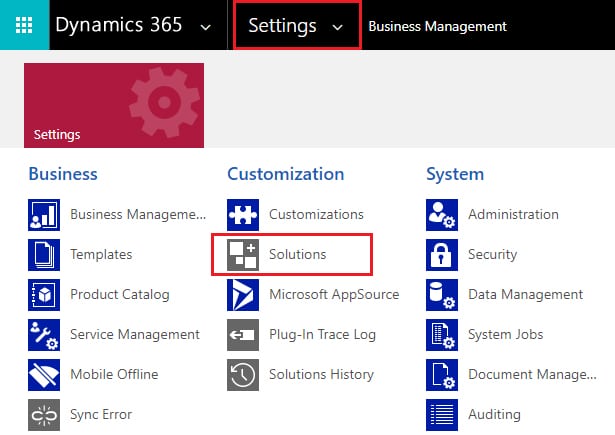
- In the top navigation, click on the Settings drop-down and click on Solutions.
- Select Import from the toolbar and select the Choose File button.
- Find the plugin (wherever you saved it), select it, and click Open
- Click Next on the Select Solution Package window
- Click Next again on the Solution Information window
- Tick the checkbox to enable any SDK message processing steps included in the solution
- Click Import
- Once the solution has imported, click Finish
2. Set Up the Plugin
To set up your API credentials:
- From your Dynamics dashboard, click on the cog in top-right navigations and click on Advanced Settings. This will open a new settings tab.
- In the top navigation, click on the Settings drop-down and click on Solutions.
- Select the display name of the plugin from the list. This will open a Solution Properties window.
- Enter your access code and click Continue.
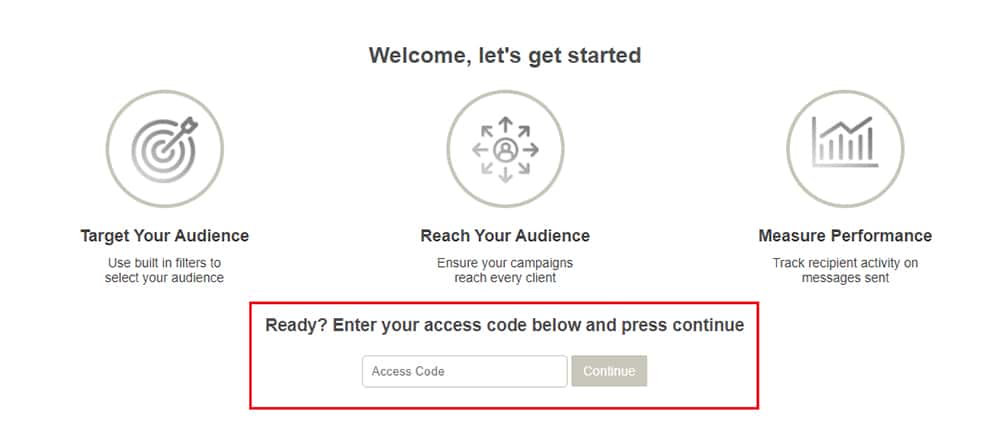
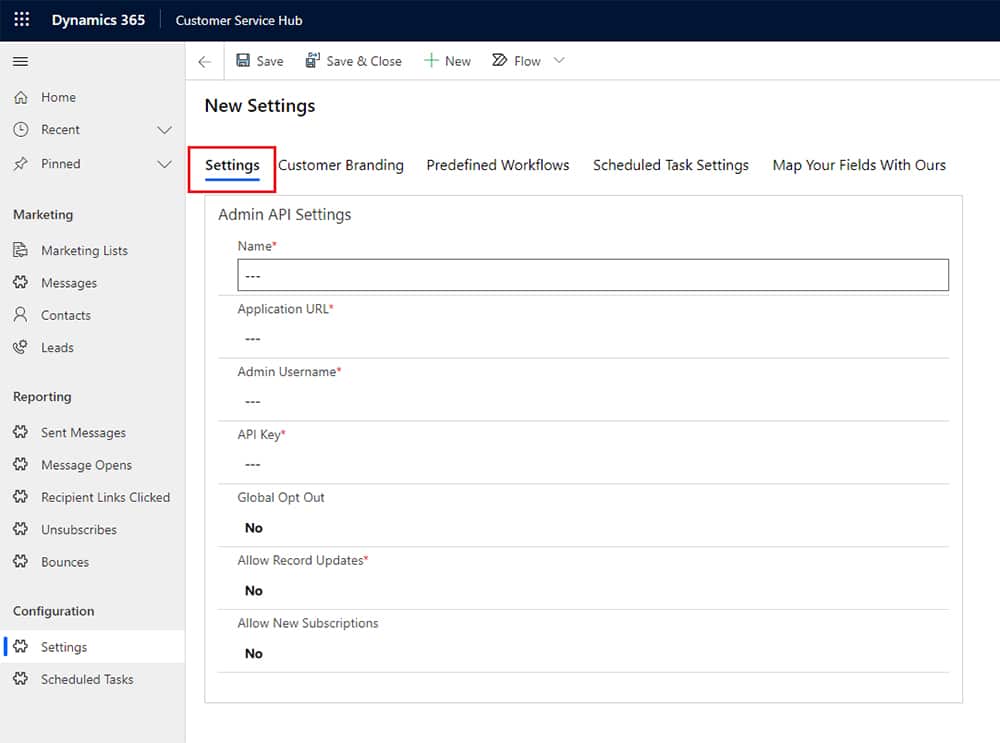
From here, populate the following API content and click Save.
API Settings
- Name: A suitable name for the setting
- Application URL: The URL provided for the API connection
- Admin Username: Provided administrator API username
- API key: Your provided administrator API key
- Global Opt Out: If a contact unsubscribes from one list, they unsubscribe from everything
- Allow Record Updates: Update your CRM contact data based on updates from our system
- Allow New Subscriptions: Allow the plugin to capture new subscribers from our system
Click the Save icon when you’re done.
Customer Branding
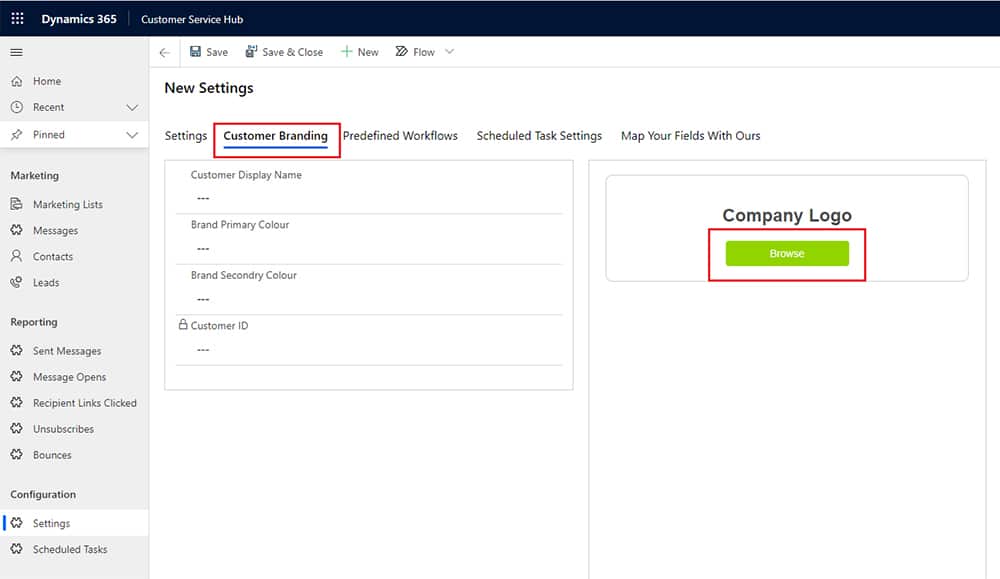
In the Customer Branding section, you can set your:
- Customer Display Name: Your company name (contacts will see this)
- Brand Primary Colour: Your brand’s hexadecimal colour code
- Brand Secondary Colour: Your brands secondary hexadecimal colour code
- Customer ID: This generates automatically
- Company Logo: Browse for this on your computer using the browse button on the right. This will enable you to crop the image before setting it.
Click Save.
Predefined Workflows
On the Predefined Workflows tab, you can enable and configure predefined workflows. Currently, these include:
- Case closed: Trigger automated communication and / or attach service ratings surveys when a case is closed.
- More to come.
Click the Save icon when you’re done.
Scheduled Task Settings
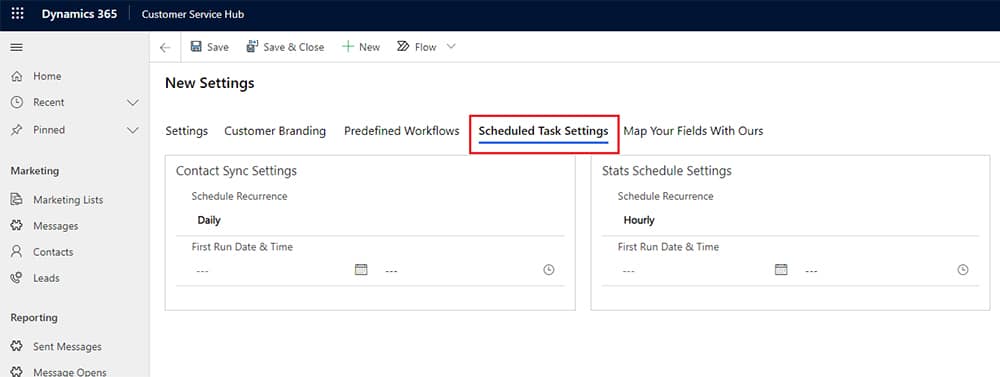
In these settings, you can
- Contact Sync Settings:
- Schedule Recurrence: Select how frequently you’d like to your contacts to sync with our system
- First Run Date & Time: The date and time for the first list sync (it will run according to your recurrence settings thereafter)
- Stats Schedule Settings:
- Schedule Recurrence: Select how frequently you’d like to your stats to be pulled from our system
- First Run Date & Time: The date and time that you’d like to run the first stats (it will run according to your recurrence settings thereafter)
- Data Pruning Options:
- Delete log data older than: This specifies how far back in time you’d like to keep your data.
Click the Save icon when you’re done.
Map Your Fields with Ours
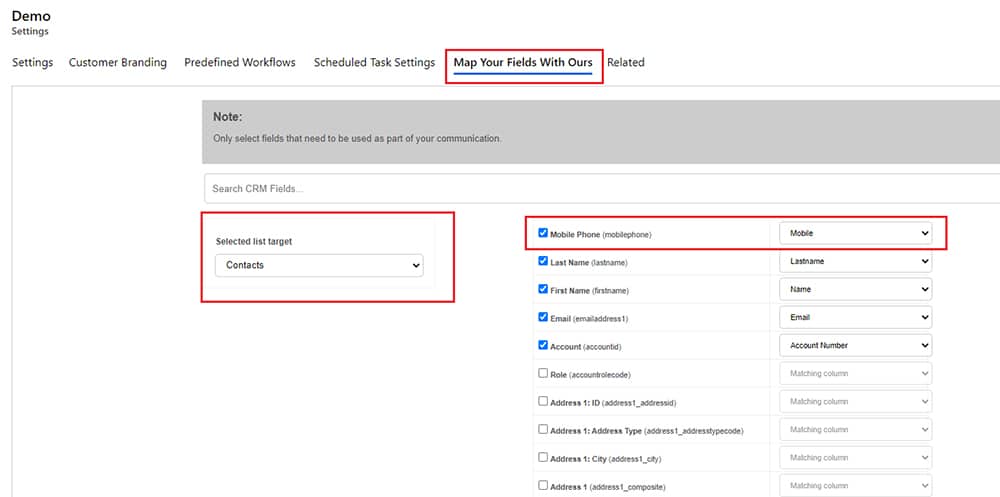
On this tab, you’ll need to specify:
- Selected list target: Change the fields you see on the left for the different entities associated with a marketing list
- Filter contact fields: Search for specific fields you want to send data from
To map your fields:
- Check the relevant field in the left-hand column. This will enable the related drop-down list on the right.
- Use the drop-down list to select the matching field from our system.
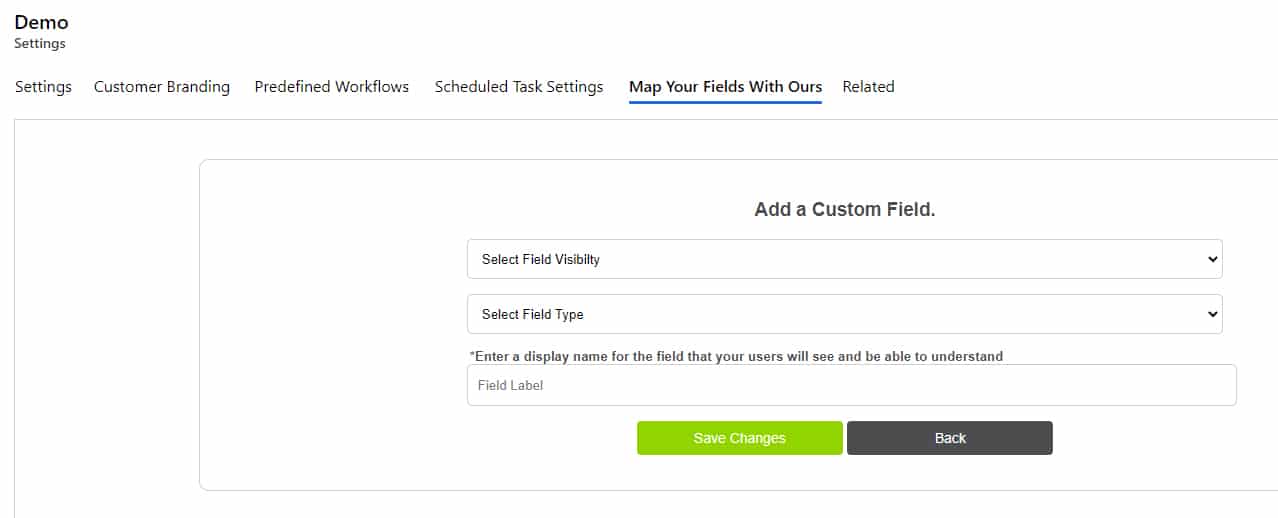
- If you want to add a custom field, click on the + New Custom Field option from the drop-down list. This will open up a modal, where you can specify:
- Description: add your own custom field
- Select Field Visibility: Make this field visible on your profile if you want a contact to be able to modify the field when updating their profile.
- Select Field Type: Specify what type of field this is (e.g.: single-line text, multi-line text, whole number, etc. See list of field types here.)
Click the Save icon when you’re done.
Note: Only select and map fields you would like to include as this data lives on our servers. The more fields you select, the longer a contact sync will take.
Add Your Users
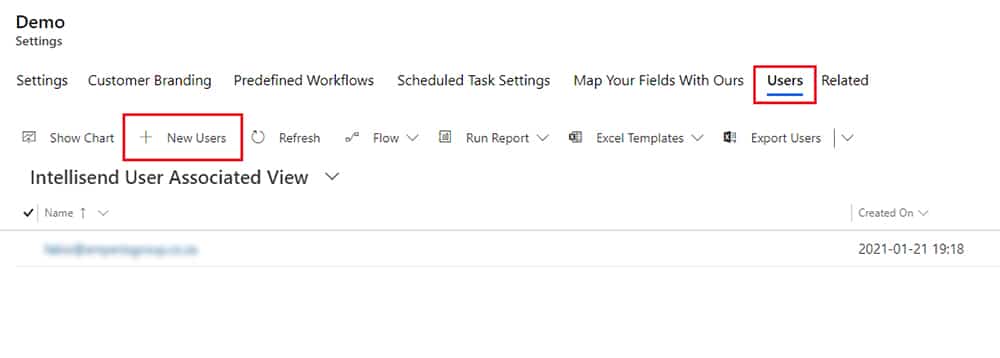
- Click on + New Users in the User grid on the right-hand side of the screen. This will open a New User window.
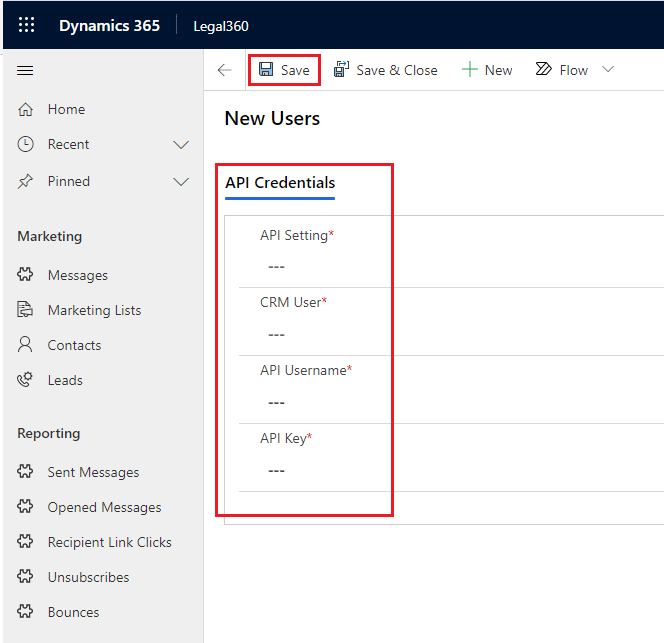
- Fill in your user details, including:
- API Setting: Pre-selected
- CRM User: Select an existing MS Dynamics user
- API username: Get the username from our system (see Where to Find Your API Credentials below)
- API key: Get their API key from our system (see Where to Find Your API Credentials below)
Click the Save icon when you’re done. Once you’re back on your dashboard, refresh your browser, so the menu ribbon is updated with the new plugin area.
Where to Find Your API Credentials
- When you’re logged in to our system, go to the Users & Access Rights page from your name drop-down in the top-right-hand navigation.
- Select the relevant user from the left-hand list
- The relevant username and API key will reflect under Authentication in the right-hand viewing pane.

Note: You can also set the user’s access rights from this screen.
Marketing Lists
The plugin uses marketing lists when sending bulk communication. MS Dynamics marketing lists are replicated via the API and prefixed with “CRM-“.
How to Create a New Marketing List
To create a new marketing list:
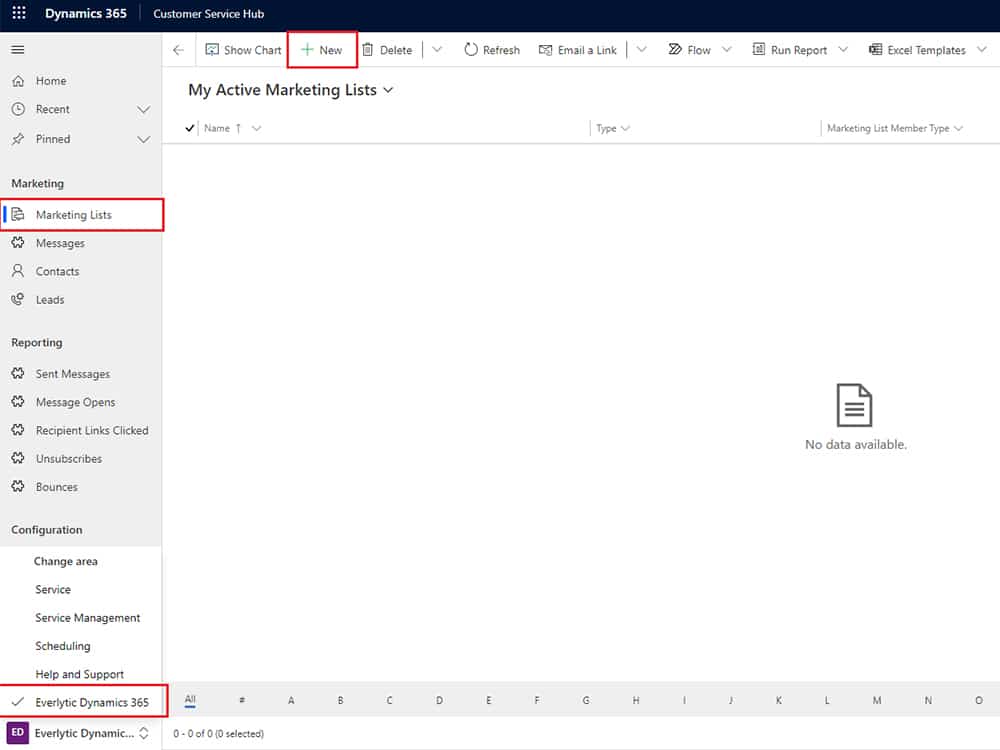
- From your Dynamics dashboard, go the new plugin area via the menu ribbon.
- Select Marketing Lists from the Marketing sub menu
- Click New in the top bar navigation
Summary
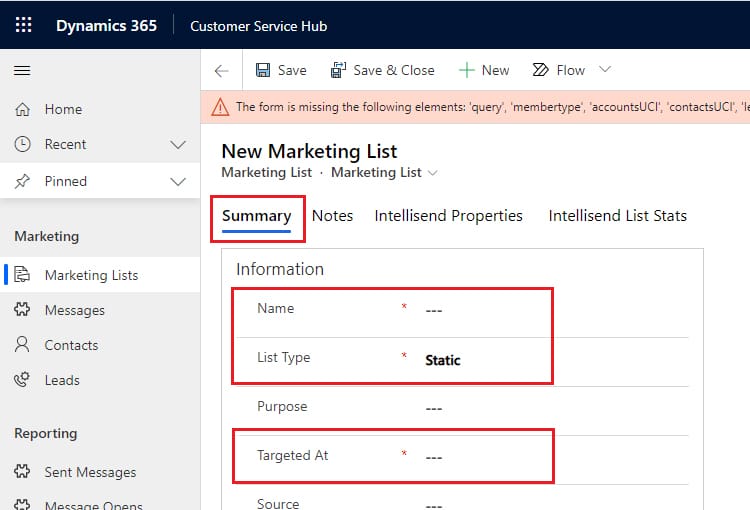
On this tab (if you’re using on-prem or older Dynamics versions, you’ll need to scroll down), you can set up:
- Name: List name
- List type: Static or dynamic. Static: adds names to a specific list. Dynamic: creates a list based on a query in real-time.
- Targeted At: The type of record that the list will hold: Account, Contact, or Lead.
Click the Save icon when you’re done.
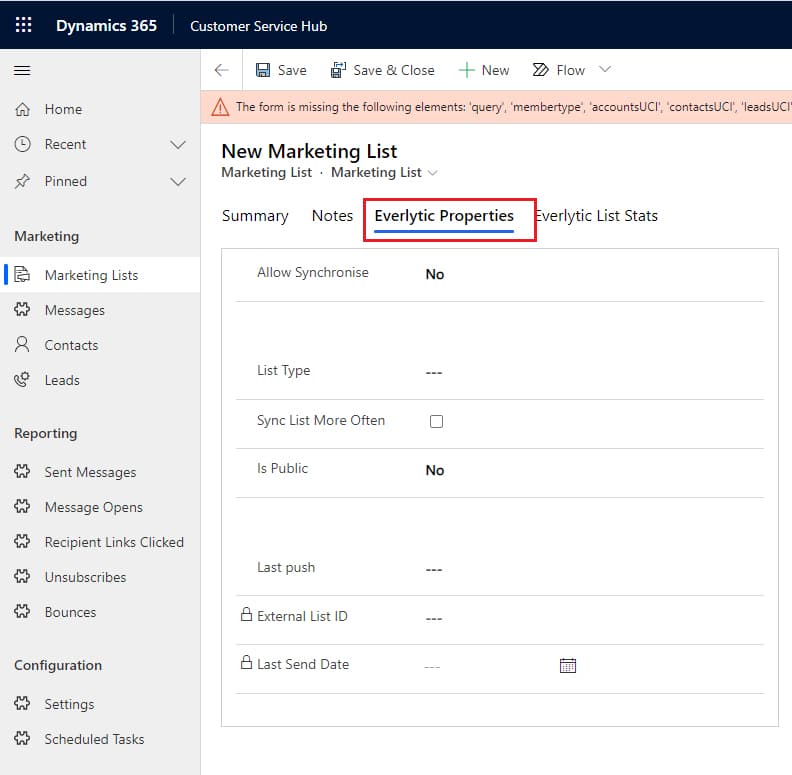
Intellisend Properties
These settings include:
- Allow synchronise: Enables the list to be shared via API
- List type: Select the purpose of this list
- Sync List More Often: Check this box to schedule how frequently you’d like this list to synchronise
- Is public: Enables subscribers to view the list and opt out online
- Last push: The last date and time that the list was synchronised via API
- External list ID: List identifier saved via API for reference
Click the Save icon when you’re done.
Add Members to Your List
To add members to your list:
- On the Marketing Lists page (navigate there by following steps 1 to 3 from How to Create a New Marketing List above), click on Manage Members in the top toolbar.
- Follow the steps provided to add the members to the list.

Sync Your List with Our System
Lists are synced automatically according to your list sync settings under Scheduled Task Setting under Getting Started above.
To sync your lists manually:
- Navigate to the Marketing Lists page (steps 1 to 3 from How to Create a New Marketing List above).
- Go to the Intellisend Properties tab (if you’re using on-prem or older Dynamics versions, you’ll need to scroll down) and click:
- Sync current list, or
- Sync all lists

Important:
- The Sync List option is only available after a marketing list has been saved. This will make an asynchronous request to the API in the background.
- The Last Synchronised field is only populated after the first sync has completed.
Compose a Message in Dynamics
Composing a message in MS Dynamics is similar to the way you’d do it in our system.
All you do is:
- From your Dynamics dashboard, go the new plugin area via the menu ribbon.
- Select Messages from the Marketing sub menu.
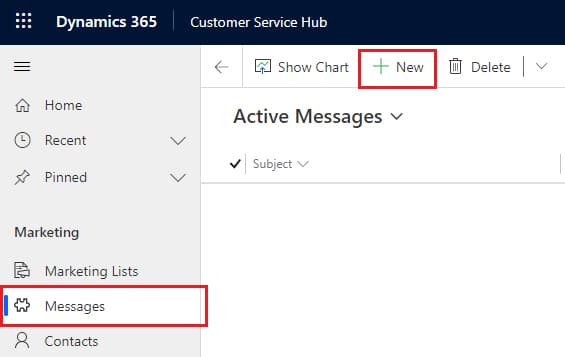
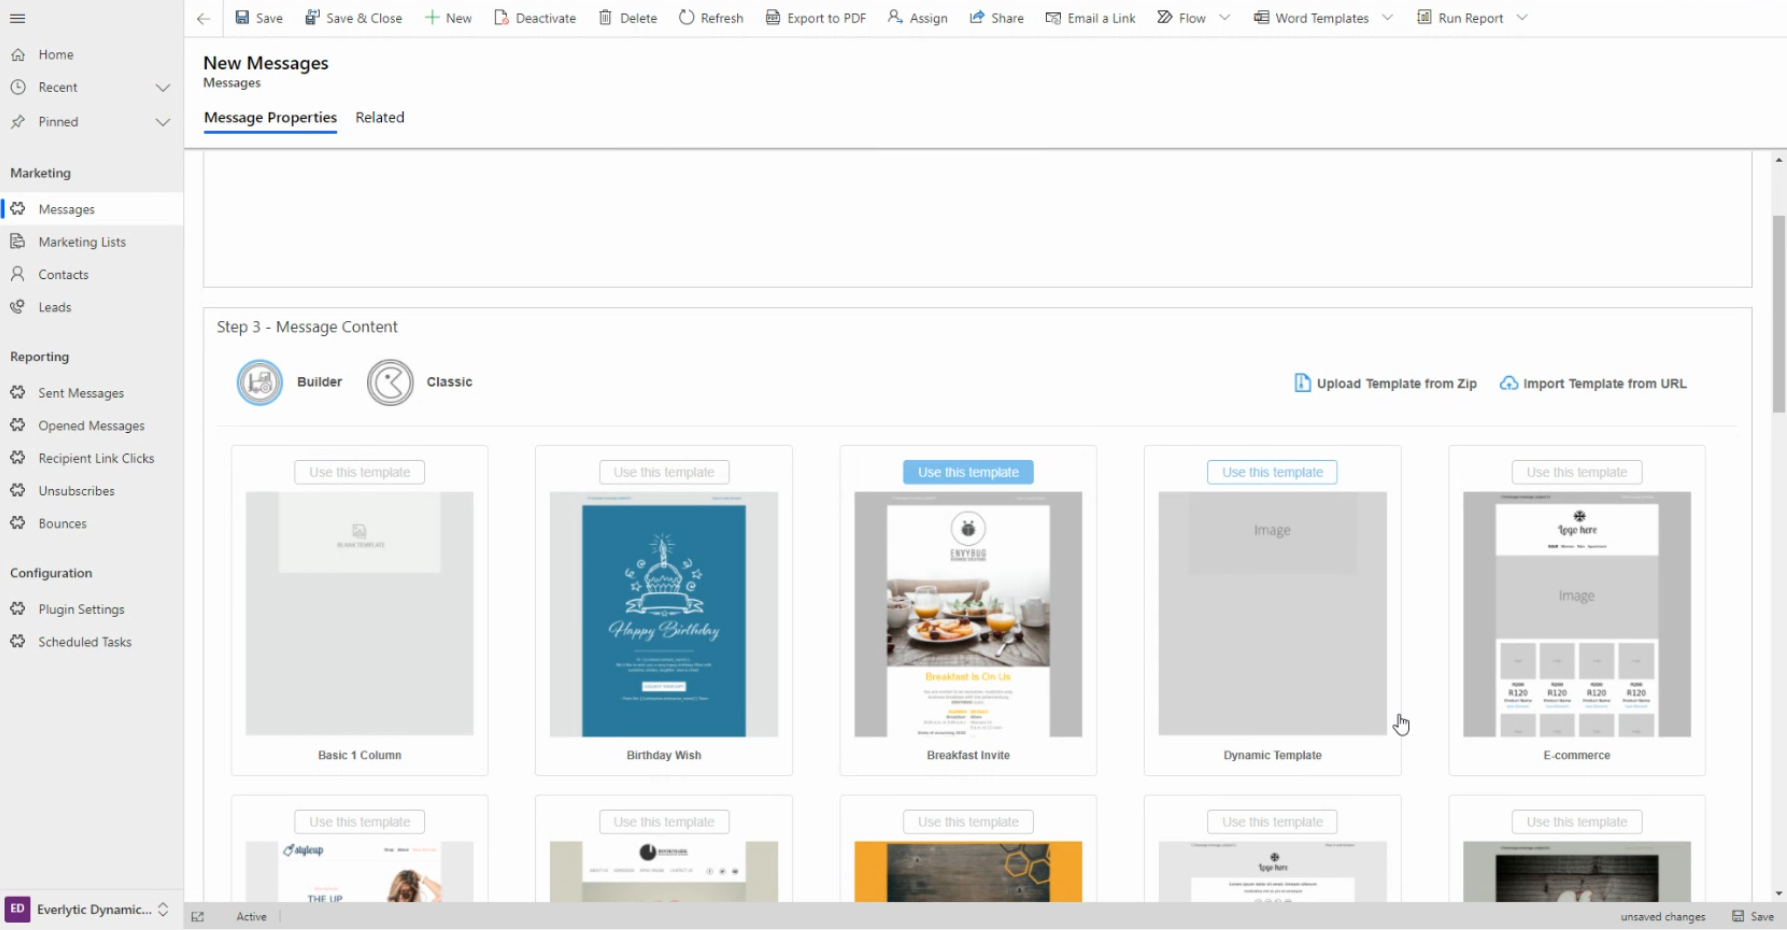
- Click New in the navigation. This will open a message properties page.
- Set your message properties, including:
- Message type: Email or SMS
- Campaign: Select a campaign – this is created via API
- Subject: The first thing your subscribers will see when they get your message
- Description: A description of your message
- From name (email only): The name of the person you’d like the email to come from
- From email (email only): The email address that you’d like to send your message from
- Reply email (email only): The email address that your recipients can reply to
- Include a response list: Redirect contacts to a subscription form from this message, adding them to a new or existing list. To create a form for this, the system will log you into our platform.
- External message ID: Read-only message ID from our system for your reference
- Click Next or Save
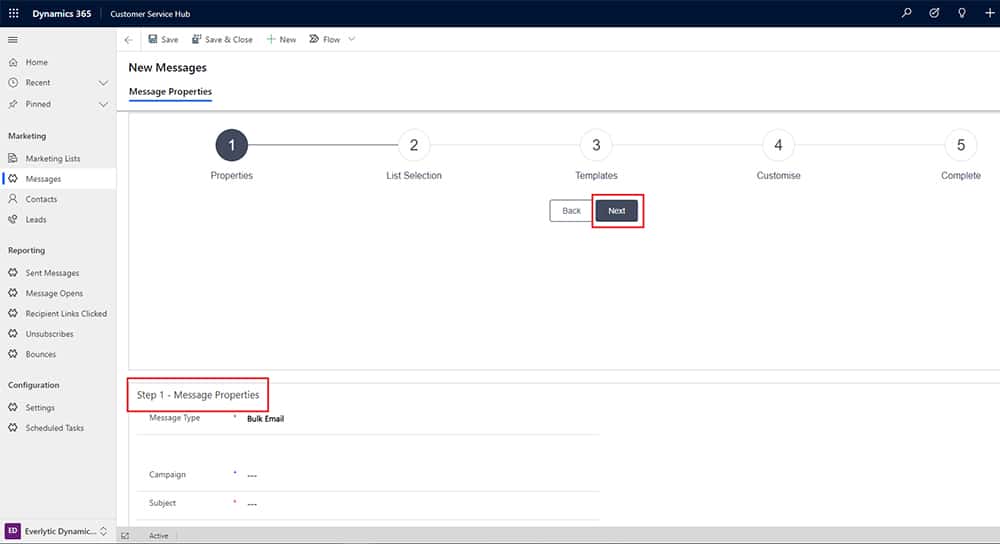
- Manage the marketing lists you’d like to send your message to by selecting the Add Existing Marketing Lists button and following the instructions. In the on prem or older versions of Dynamics, select the + sign on the top-right of the grid.
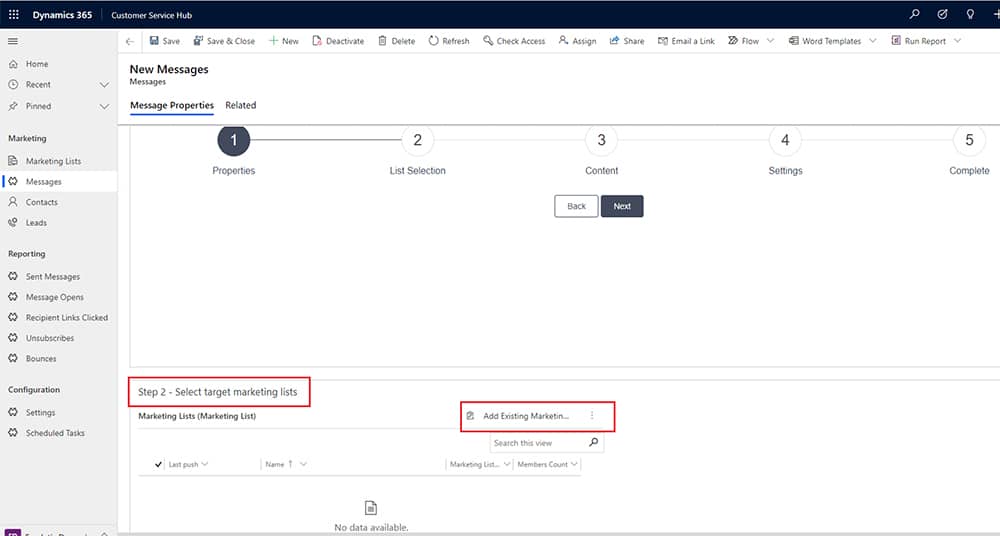
- Click Next.
- For email: This will navigate you to template selection. Select your template, your composition type (Builder or Classic), and click Next.
- For SMS: This will open the SMS composition modal in Dynamics. Type your message and click Next.
- Sending options:
- Schedule Date Time
- Track Clicks & Shorten Links
- Sync Contacts Before Send
- Click Next to send
- Sending options:
Message Stats & Targeting
Message stats are retrieved as a scheduled background process and are updated when viewing a message.
Stats Overview
To view your overall message stats:
- From your Dynamics dashboard, go the new plugin area via the menu ribbon.
- Select Messages from the Marketing sub menu.
- View the stats overview for all your messages.

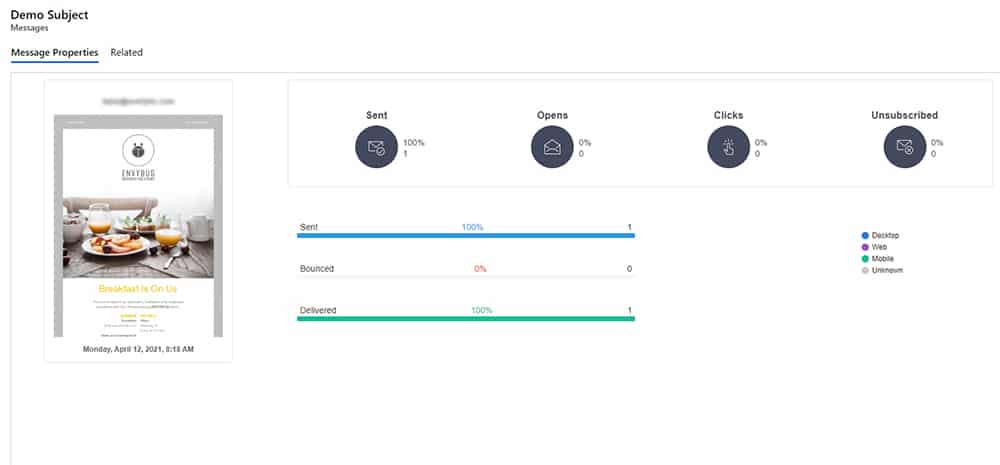
Stats for Individual Messages
To view the detailed stats for a specific message:
- Find and select the message you’re interested in. This will open the message properties page in Dynamics.
- View your message’s performance.
Recipient Action Stats
To view message recipient actions in the cloud / online version of Dynamics 365: When on the Message Properties view, click on the Related tab. This will allow you to open a view for:
- Bounces: Which messages bounced to which contacts
- Sent Messages: The contact that you sent the message to
- Message Opens: Which contacts opened your message
- Link Clicks: Which contacts clicked on links in your messages
- Marketing Lists: Which marketing lists you sent this message to
To view message recipient actions in on-prem or older versions of Dynamics, click the dropdown next to the message name on the top ribbon and select one of the above stats options in the Common category.
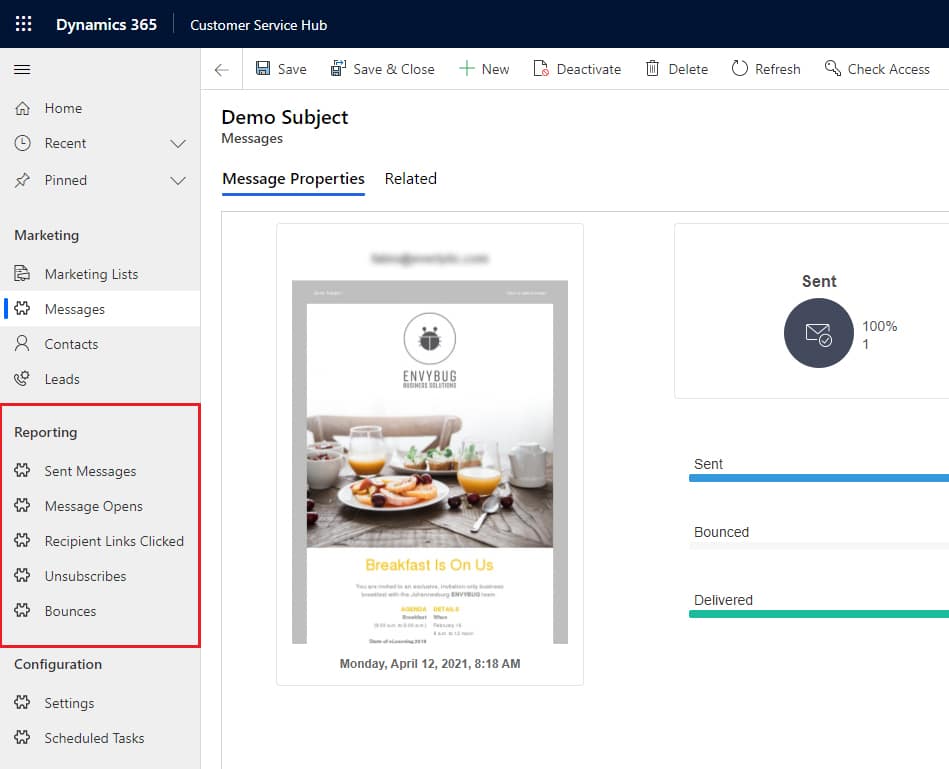
Note: You can target recipients based on whether they’ve opened or clicked on your messages.
Stats by Contact
You can view contact stats for messages sent, opened, clicked on, bounced, and unsubscribes.
To view all stats by contact:
- If you’ve come directly from viewing recipient action stats, click on the contact you’d like the records on. This will take you to the individual contact’s page where you can view their specific history.
- If you’re finding this from the dashboard, go the new plugin area via the menu ribbon.
- Select Contacts from the Marketing sub menu.
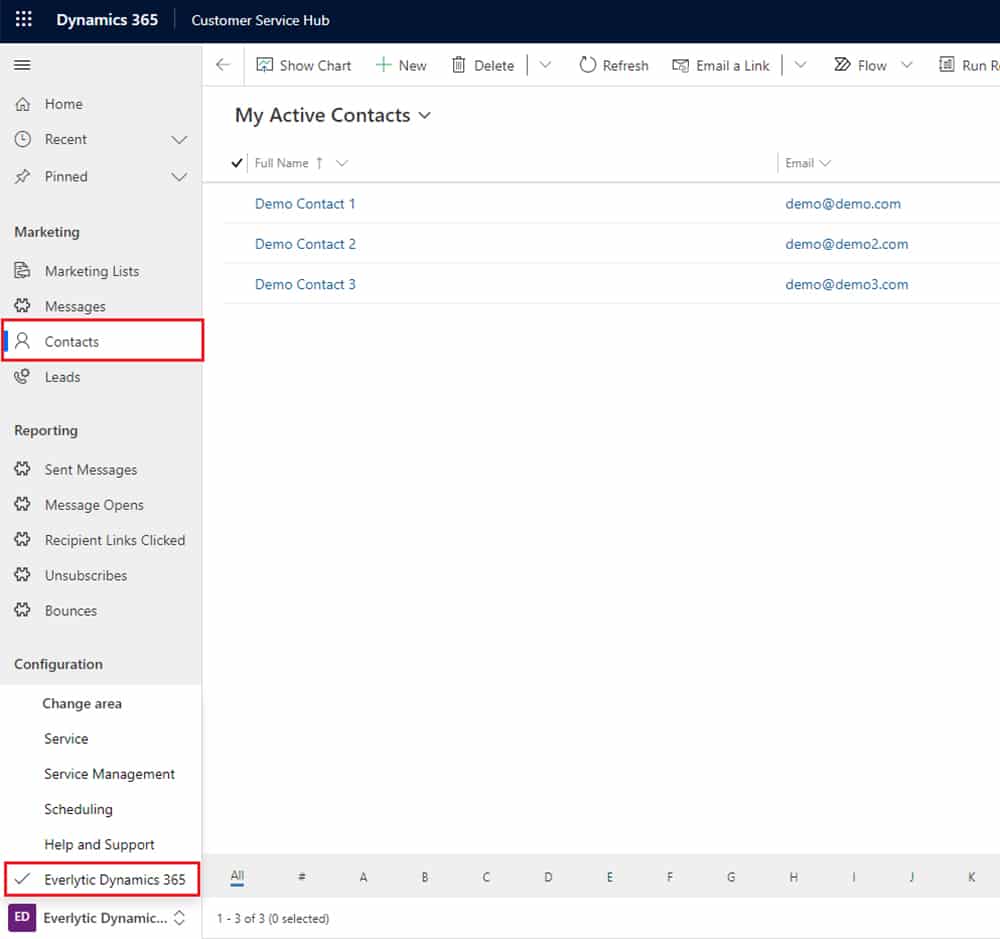
- Search for the contact
- Select the contact’s name or double click on their row. This will open the contact page.
- From here, click on related and select the specific stats you want to view on this contact.
- View contact stats

